Neza-D1开发板学习之按键和旋转编码器篇
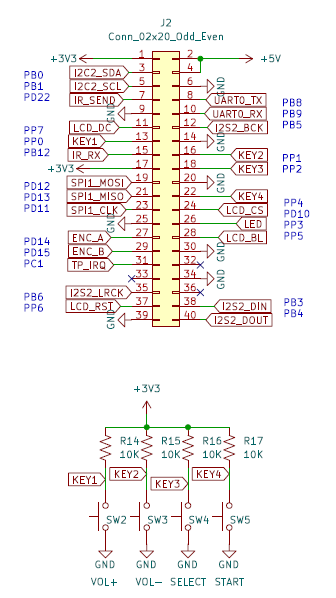
Neza-D1开发板上只引出一个按键,是使用的LRADC检检测按键的,想使用更多按键,可以使用板子上通过PCF8574扩展出来的IO,我画的扩展板使用了四个按键,分别为PP0,PP1,PP2,PP4

设备树配置如下 内核需要勾选 Polled input device skeleton
gpio_keys {
compatible = “gpio-keys”;
pinctrl-names = “default”;
/pinctrl-0 = <&key_pins>;/
#address-cells = <1>;
#size-cells = <0>;
autorepeat;
button@0 {
label = “Key volume up”;
linux,code =;
gpios = <&pcf8574 0 GPIO_ACTIVE_LOW>; /* PP0 /
};
button@1 {
label = “Key volume down”;
linux,code =; PP1 /
gpios = <&pcf8574 1 GPIO_ACTIVE_LOW>; /
};
button@2 {
label = “Key back”;
linux,code =; PP2 /
gpios = <&pcf8574 2 GPIO_ACTIVE_LOW>; /
};
button@3 {
label = “Key enter”;
linux,code =; PP4 */
gpios = <&pcf8574 4 GPIO_ACTIVE_LOW>; /
};
};编码器接在D1的PD14 PD15 设备树如下 注意需要内核勾选<> Polled GPIO Decoder Input driver
rotary {
compatible = “rotary-encoder”;
pinctrl-names = “default”;
/pinctrl-0 = <&rotary_pins>;/
gpios = <&pio 3 14 GPIO_ACTIVE_LOW>, <&pio 3 15 GPIO_ACTIVE_LOW>; / PD14, PD15 /
linux,axis = <0>; / REL_X */
rotary-encoder,encoding = “gray”;
rotary-encoder,relative-axis;
};
然后在内核勾选系统启动会有如下log
 [    0.111735] input: sunxi-keyboard as /devices/virtual/input/input0  这是板载的那个LRADC 按键
 [    1.668976] rotary-encoder soc@3000000:rotary: gray 这是旋转编码器
 [    1.675145] input: soc@3000000:rotary as /devices/platform/soc@3000000/soc@3000000:rotary/input/input1
 [    3.178668] input: soc@3000000:gpio_keys as /devices/platform/soc@3000000/soc@3000000:gpio_keys/input/input5 这是扩展出来的那4个按键
查看系统里已注册的输入设备,用这个比较清楚,ls /dev/input也可以
# evtest
No device specified, trying to scan all of /dev/input/event*
Available devices:
/dev/input/event0: sunxi-keyboard
/dev/input/event1: soc@3000000:rotary
/dev/input/event2: sunxi-ir
/dev/input/event3: audiocodec sunxi Audio Jack
/dev/input/event4: soc@3000000:gpio_keys
/dev/input/event5: ns2009_ts可以使用evtest或hexdump来测试按键是否正常了
在代码使用就比较简单了
#include <errno.h>
#include <global.h>
#include <linux/fcntl.h>
#include <linux/input.h>
#include <signal.h>
#include <stdio.h> //-std=c99 -std=gnu99
#include <stdlib.h>
#include <string.h>
#include <sys/types.h>
#include <unistd.h>
#define msleep(t) usleep((t)*1000)
FILE *fp;
int32_t fd_key;
int32_t fd_encoder;
struct input_event t;
int main(int argc, char const *argv[])
{
fd_key = open(“/dev/input/event1”, O_RDONLY | O_NONBLOCK);
if (fd_key < 0)
{
fprintf(stderr, “error:can not open /dev/input/event1\n”);
return -1;
}
fd_encoder = open(“/dev/input/event4”, O_RDONLY | O_NONBLOCK);
if (fd_encoder < 0)
{
fprintf(stderr, “error:can not open /dev/input/event4\n”);
return -1;
}
while (1)
{
// rotary encoder
if (read(fd_encoder, &t, sizeof(t)) == sizeof(t))
{
if (t.type == EV_REL)
{
LOG_D(“ROTARY DIR: %d->%s\n”, t.value, t.value == 1 ? “CC” : “CW”);
rotary_encoder_handler(&u8g2, t.value);
}
}
// key
if (read(fd_key, &t, sizeof(t)) == sizeof(t))
{
if (t.type == EV_KEY)
{
switch (t.code)
{
case KEY_OK:
LOG_D(“KEY_ENTER %s \n”, t.value ? “Pressed” : “Released”);
if (t.value == 0)
rotary_encoder_button_handler(&u8g2);
break;
case KEY_SELECT:
LOG_D(“KEY_SELECT %s \n”, t.value ? “Pressed” : “Released”);
break;
case KEY_VOLUMEUP:
LOG_D(“KEY_VOLUMEUP %s \n”, t.value ? “Pressed” : “Released”);
if (t.value == 0)
{
rotary_encoder_handler(&u8g2, -1);
}
break;
case KEY_VOLUMEDOWN:
LOG_D(“KEY_VOLUMEDOWN %s \n”, t.value ? “Pressed” : “Released”);
if (t.value == 0)
{
rotary_encoder_handler(&u8g2, 1);
}
break;
default:
break;
}
}
}
usleep(1);
}
return 0;
}
